
I HAVE CHOSEN TO POST THIS PATTERN FOR A SECOND TIME ON MY BLOG BECAUSE SOME PEOPLE ARE HAVING TROUBLES ACCESSING THE FIRST POST. THE PATTERN IS EXACTLY THE SAME!
I created this headband and pattern when a friend of mine, Jenna, wanted a custom cable headband for the winter! Thank you Jenna for your great idea! This is my favorite fall/winter accessory!
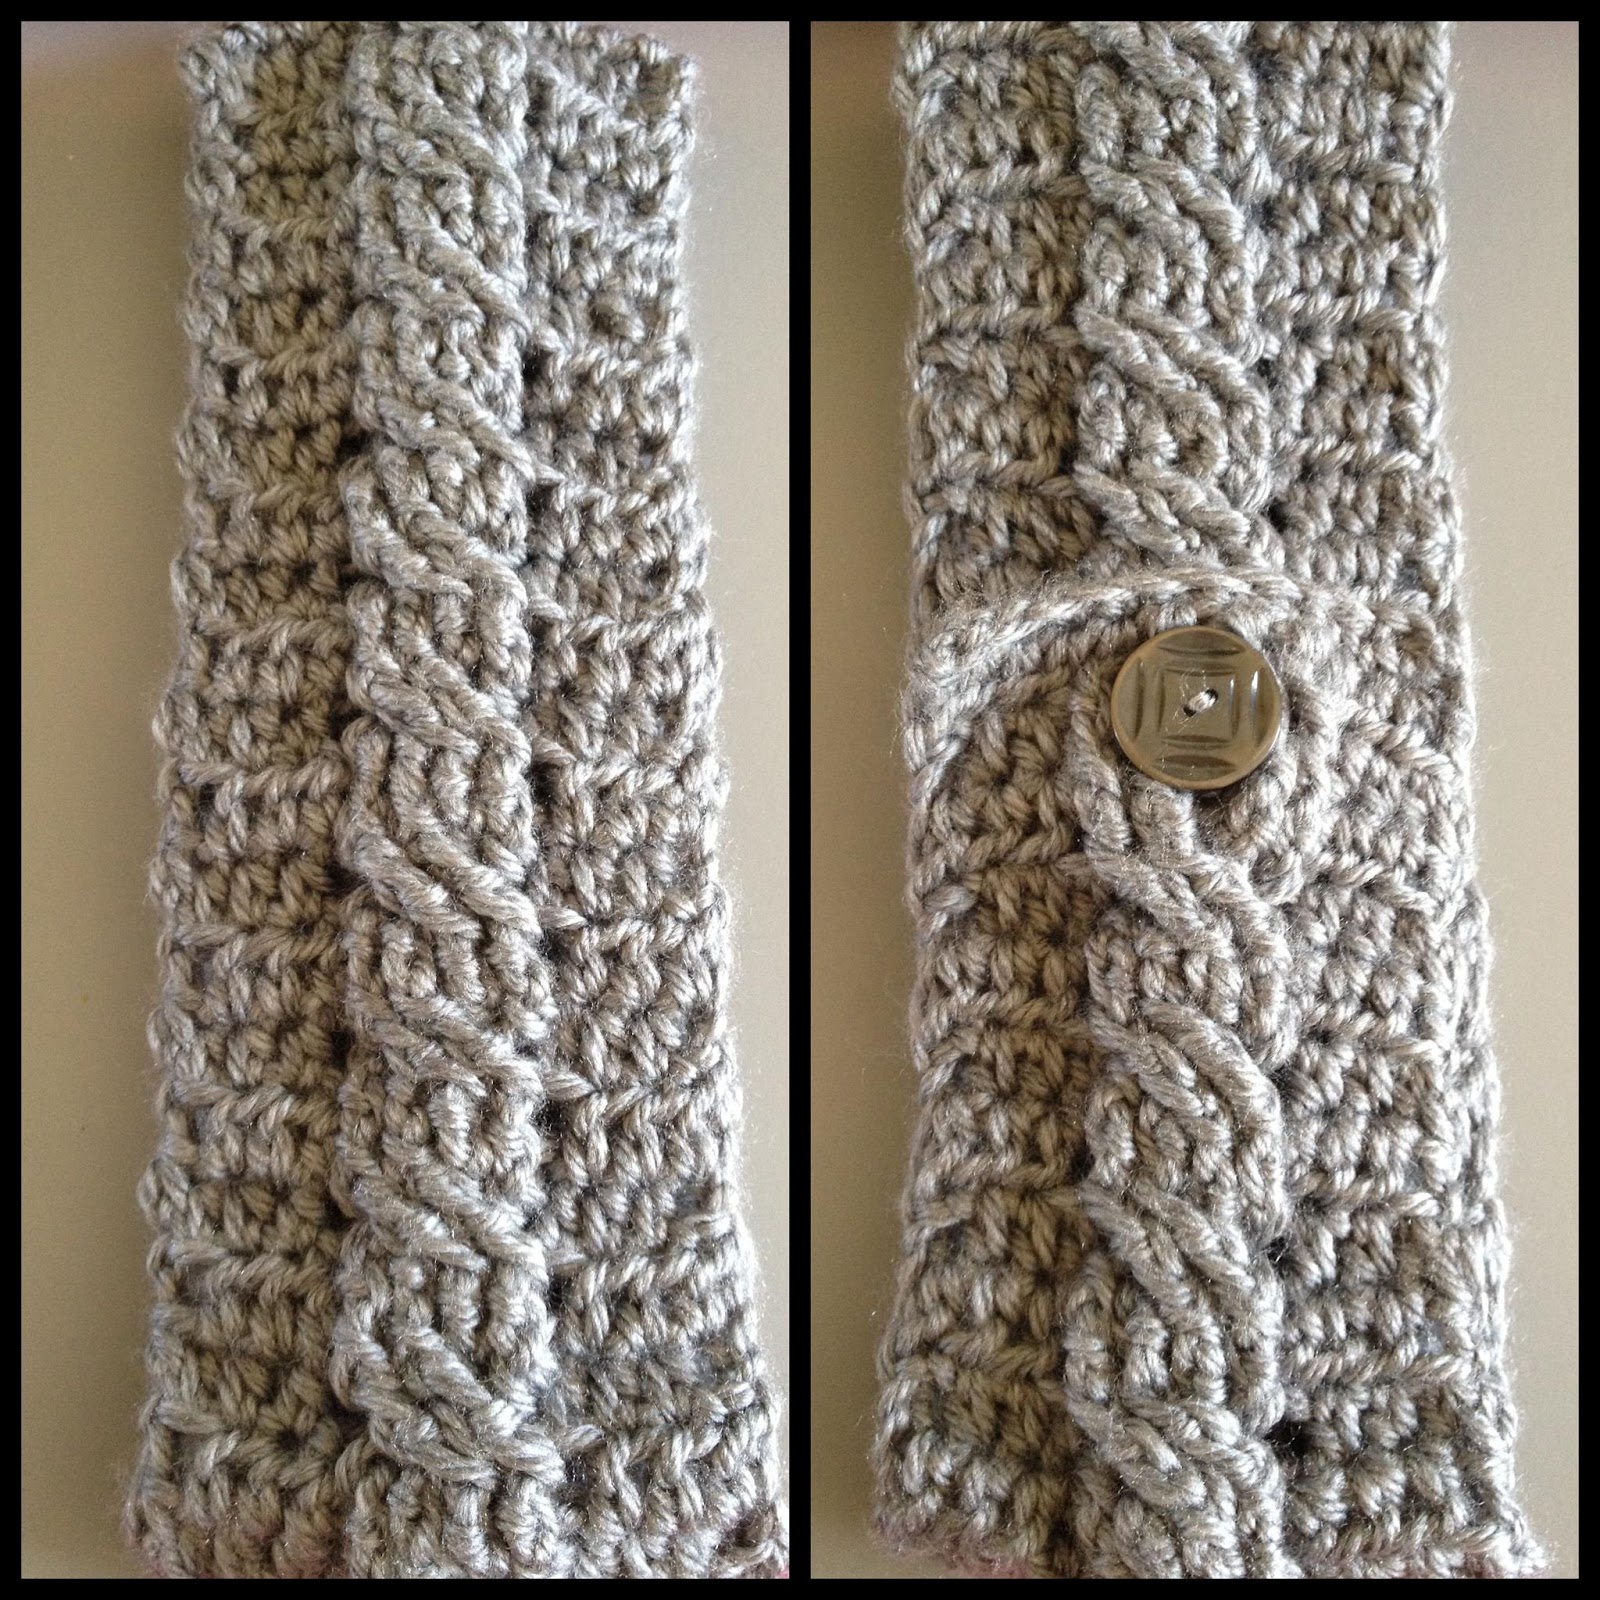
-makes an adult headband for most heads measuring around 21”
NOTE:
This pattern is an intermediate pattern because of the use of the front
and back post triple crochet stitches to make the cable. I learned how
to do these stitches just by watching video tutorials on you-tube.
Supplies:
Crochet hook ‘I’
Simply Soft Yarn
1 or 2 buttons for closure
Sewing needle
Abbreviations Used:
-ch: chain
-sts:
stitches
-sc: single crochet
-hdc: half double crochet
-fptr: front post triple crochet
-bptr: back post triple crochet
Headband:
-chain 13 (or any number that leaves 4 cable stitches
in the middle and an even number of stitches on both sides- So here I wanted
4,4,4 so the ch 13 will make 12 sts)
Row 1: sc in 2nd chain and each remaining
chain, turn
Row 2: ch 2 (counts as first hdc here and
throughout), hdc in each of the remaining 11 sts, turn (12 sts total)
Row 3: ch 2, hdc in next 3 sts, fptr in post of each
of the next 4 hdc, hdc in each of 4 remaining st, turn
Row 4: ch 2, hdc in next 3 sts, bptr in post of each of the 4
fptr, hdc in 4 remaining st, turn
Row 5: ch 2, hdc in next 3 sts, skip the next 2 stitches (sts 1 & 2) and fptr in post of 3rd bptr and 4th bptr, then go back to the 2 skipped sts and fptr in the post of the 1st bptr and 2nd bptr (in that order
every time- 3, 4, 1, 2), hdc in remaining 4 sts, turn
(*make sure when you do the fptr in the 1st bptr and 2nd bptr, you are doing these over top (or in front of) the 3rd and 4th stitches. This is what gives it the cross-over look*)
(*make sure when you do the fptr in the 1st bptr and 2nd bptr, you are doing these over top (or in front of) the 3rd and 4th stitches. This is what gives it the cross-over look*)
Row 6: repeat row 4
Row 7: repeat row 5
Row 8: repeat row 4
Row 9: repeat row 5
-Continue this pattern until the headband measures about 19”-20" long, finishing with row 4. (about 20 cross-overs)
-Row ? (however long your headband is): repeat row 3
-Hdc 2 rows as the ending edge. Tie off.
Sew in ends and attach button between the 2 hdc rows at the end. When buttoning the headband, I just slip the button through the middle of the 4 cable stitches- there should be a big enough gap.
PLEASE
LEAVE QUESTIONS, COMMENTS, AND FEEDBACK FOR ME! THIS IS MY FIRST
ATTEMPT AT WRITING AND POSTING PATTERNS AND I'M VERY NEW TO THIS!
Can't wait to try this.
ReplyDeleteThanks for the pattern. I will be making this as a gift ;)
ReplyDeleteThis comment has been removed by the author.
ReplyDeleteVery cute, gonna try this weekend! Thanks for sharing!
ReplyDeleteI made one of these for my daughter a few weekends ago. I did adjust the width (fewer) because my crocheting gauge never matches patterns. I also used chunky yarn. I thought it was a bit, well, chunky but a lady at my daughter's office wants me to make 10 for Christmas gifts! Thanks for sharing!
ReplyDeleteThat's awesome! I'm so happy to hear this!!
DeleteSuper excited to try this pattern! I make a head wrap but it is very different than this. I like having more than one option for people to choose from (I sell my creations...giving credit where credit is due of course)! Thanks for sharing!
ReplyDeleteHi I love the pattern. I plan to make one as a gift for a friend.
ReplyDeleteI made this tonight and it turned out great. I am very thankful of you for sharing the pattern, one crochetist to another :)
ReplyDeleteYour headband is such a pretty color. Do you remember which brand and color of yarn that you used?
ReplyDeleteThanks,
Candis
Hi Candis! I used simply soft grey heather for this headband! Simply soft makes it a perfect thickness!
DeleteI am loving this headband and am trying to work out how to crochet it! I think I have done up to row 4 and 5 correct but then in a muddle when it comes to repeating the rows - can't see where to crochet the bptc. Is there a you tube video that you have found that may be able to help?
ReplyDeleteThank you
Angela.
Hi Angela- I recommend this youtube video from another crocheter. I think the cable stitch is illustrated well here. Good luck!
Deletehttps://www.youtube.com/watch?v=x0XaqTQaYyM
I just made this headband. LOVE IT! I will alter the next one a little and make it a hat. Thank you!!!
ReplyDeleteI am SO happy to find this pattern. Was looking for a easier pattern to try and this is PERFECT. Will be perfect with the fingerless knit gloves I just worked up! Thank you for another pattern to work into my repertoire. I truly appreciate you sharing your patterns!
ReplyDeleteYes I made the cable stitch into a fingerless glove pattern as well! They make a great accessory!
DeleteSuper simple, thanks for reposting it :)
ReplyDeleteCan you draw a diagram ...
ReplyDeleteok, something like I did it :)
ReplyDelete-------------------------------------------
http://amy-crochet.blogspot.com/
https://www.facebook.com/amy.crochet.33
Thank you for the pattern - everyone seems to love this headband and I am so excited to start making them!!!
ReplyDeleteThank you. Can't wait to try this.
ReplyDeletehi! loving the pattern! i wanna try it with some left-over yarn i have, but i'm wondering how much i need to complete it... does anyone remebers how much they needed?
ReplyDeleteI just finished it and I used a little over half of a 3 oz skein of yarn I had left over from another project.. :)
DeleteI just made it and I love it!!! Thanks so much for the pattern! It was super easy to follow and well written! I used the Caron Simply Soft Party yarn in Silver Sparkle and it looks really nice!
ReplyDeleteYou're welcome! I'm so pleased to hear this! I'll have to try the sparkle yarn- that sounds fun!
DeleteDoes anyone know how wide this headband is?
ReplyDeleteAbout 4 inches. It depends on your tension though.
DeleteWhat ply yarn did you use?
ReplyDeleteWorsted weight is 4. Simply soft doesn't label a "ply".
DeleteIs the hook size I or L ?
ReplyDeleteI have received many compliments when I wear the headband out! Thank you so much! I am relatively new to crochet and your pattern was very easy to follow :) I was wondering, do you allow the sale of finished products made from your pattern? :)
ReplyDeleteThank you, cannot wait to make for my sister.
ReplyDeleteThis pattern is so fun! I've struggled with cable stuff before but this one makes sense! I've made a couple already in Vanna's Choice--they come out nice and snuggly :)
ReplyDeleteplease do u make a video for this pattern
ReplyDeletei don't the understand row 5.
thnk u
This is a lovely pattern. I'm making one for my Granddaughter and will definitely make more. Thanks for sharing
ReplyDeleteThis is a lovely pattern. I'm making one for my Granddaughter and will definitely make more. Thanks for sharing
ReplyDeleteI am not real good at reading patterns but this was easy for me to follow and turned out great. Thank you for sharing
ReplyDeleteOmg it's soooooo cute gonna try this for my 4 yr old wish me luck...thanks for publishing this and having it free is like a superrrr plus 😍
ReplyDeleteI just made this ear-warmer for my granddaughter in Kelly-Green (UNT Student). It is beautiful! She loves it. I put three buttons on the underside so she can easily adjust it to fit her head and the extending side will not show. It is easy to make. Thanks for sharing the pattern.
ReplyDeleteGeorgia
Fort Worth, TX
I'm making this for myself to wear as my chemo hair grows out. Thanks so much for the pattern. You did a great job!
ReplyDeleteThanks so much for sharing- this is going to make a great gift for a friend! I think I know why people are getting confused on row 5- it's ambiguous if you're supposed to combine the 3rd and 4th stitch or do two separate fptr stitches next to each other. Consider using () to make it a bit more clear. Really great job coming up with the pattern, and I think you did a good job of explaining it- I just noticed a few comments confused about row 5 and thought I figured out the issue.
ReplyDeleteI just finished making this. I had never done a cable stitch and so the video you suggested was very helpful. I cannot wait to wear it. Thank you for posting this very cute pattern.
ReplyDelete