
I created this headband and pattern when a friend of mine, Jenna, wanted a custom cable headband for the winter! Thank you Jenna for your great idea! This is my favorite fall/winter accessory!
-makes an adult headband for most heads measuring around 21”
NOTE: This pattern is an intermediate pattern because of the use of the front and back post triple crochet stitches to make the cable. I learned how to do these stitches just by watching video tutorials on you-tube.
Supplies:
Crochet hook ‘I’
Simply Soft Yarn
1 or 2 buttons for closure
Sewing needle
Abbreviations Used:
-ch: chain
-sts:
stitches
-sc: single crochet
-hdc: half double crochet
-fptr: front post triple crochet
-bptr: back post triple crochet
Headband:
-chain 13 (or any number that leaves 4 cable stitches
in the middle and an even number of stitches on both sides- So here I wanted
4,4,4 so the ch 13 will make 12 sts)
Row 1: sc in 2nd chain and each remaining
chain, turn
Row 2: ch 2 (counts as first hdc here and
throughout), hdc in each of the remaining 11 sts, turn (12 sts total)
Row 3: ch 2, hdc in next 3 sts, fptr in post of each
of the next 4 hdc, hdc in each of 4 remaining st, turn
Row 4: ch 2, hdc in next 3 sts, bptr in post of each of the 4
fptr, hdc in 4 remaining st, turn
Row 5: ch 2, hdc in next 3 sts, skip the next 2 stitches (sts 1 & 2) and fptr in post of 3rd bptr and 4th bptr, then go back to the 2 skipped sts and fptr in the post of the 1st bptr and 2nd bptr (in that order
every time- 3, 4, 1, 2), hdc in remaining 4 sts, turn
(*make sure when you do the fptr in the 1st bptr and 2nd bptr, you are doing these over top (or in front of) the 3rd and 4th stitches. This is what gives it the cross-over look*)
(*make sure when you do the fptr in the 1st bptr and 2nd bptr, you are doing these over top (or in front of) the 3rd and 4th stitches. This is what gives it the cross-over look*)
Row 6: repeat row 4
Row 7: repeat row 5
Row 8: repeat row 4
Row 9: repeat row 5
-Continue this pattern until the headband measures about 19”-20"
long, finishing with row 4. (about 20 cross-overs)
-Row ? (however long your headband is): repeat row 3
-Hdc 2 rows as the ending edge. Tie off.
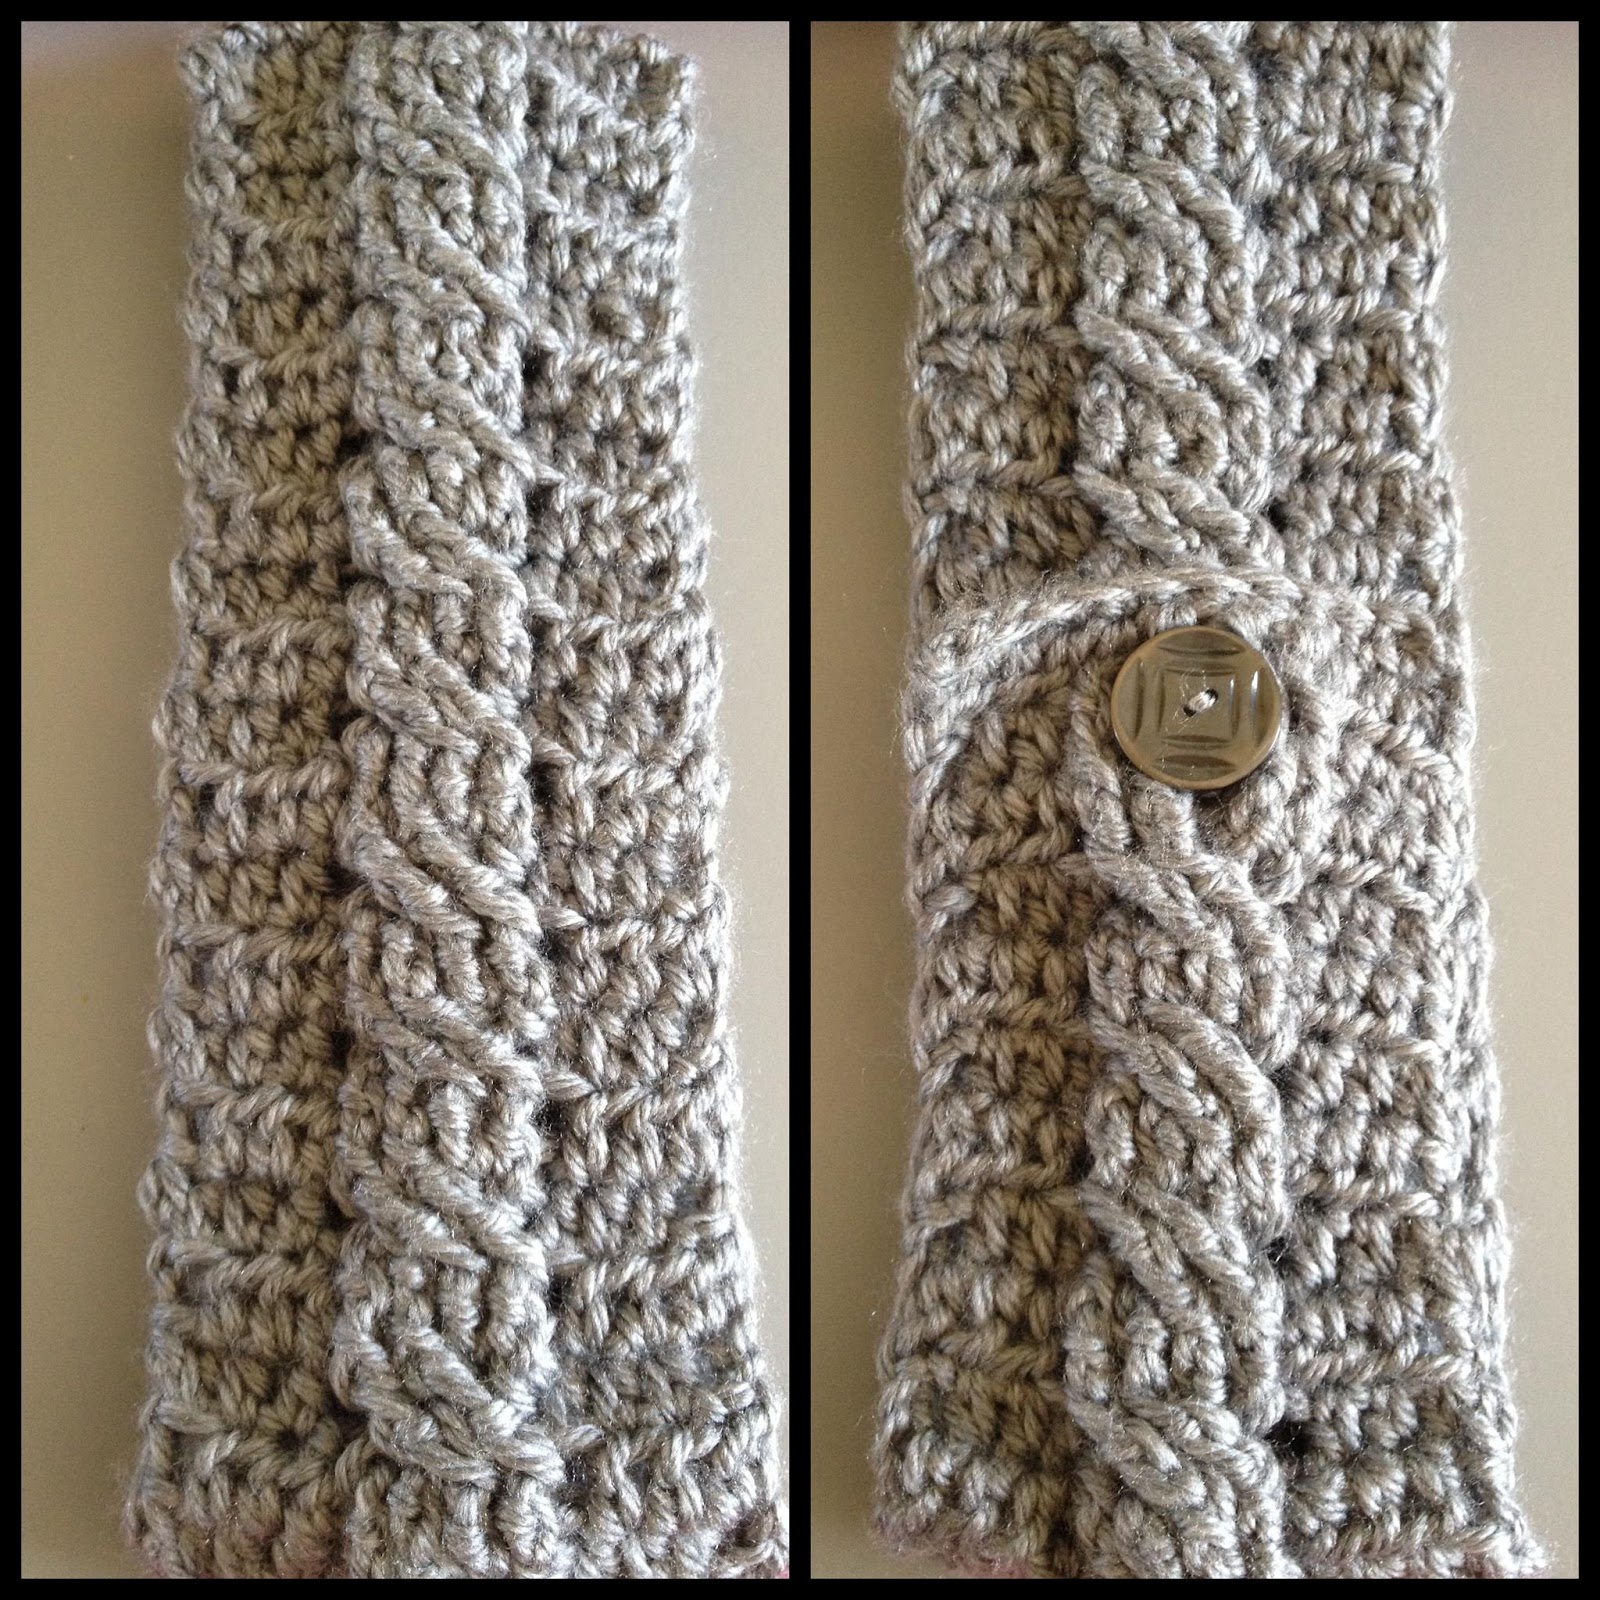
Sew in ends and attach button between the 2 hdc rows at the
end. When buttoning the headband, I just slip the button through the middle of
the 4 cable stitches- there should be a big enough gap.
PLEASE LEAVE QUESTIONS, COMMENTS, AND FEEDBACK FOR ME! THIS IS MY FIRST ATTEMPT AT WRITING AND POSTING PATTERNS AND I'M VERY NEW TO THIS!
Awesome! Almost finished with mine. Thanks for taking the mystery out of a cable stitch for me. Keep the patterns coming!
ReplyDeleteThanks for commenting! I'm so glad I could help you out!
DeleteI made this and it turned out great! Thanks so much for posting!
ReplyDeleteI'm so happy you like it! Thank you for the support.
DeleteHello Melissa!
ReplyDeleteI really love this pattern. And I am trying to make a headband myself (like right at this moment), but I am having trouble with the instructions on row 5.
Is it the 3rd, 4th, 1st snd 2nd hdc of the same row or the previous row? I am a little confused, haha.
Thanks so much in advance!
Thank you for the feedback! I cleaned up the instructions a little bit.
DeleteYou are actually crocheting in the post of the stitches from the previous row. So the stitches are being worked kinda on top of each other. So for row 5, you are fptr on the post of the previous row's bptr.
Did I help clarify??
Oh yes! It's looking good now!!! Thank you so much!
DeleteHello! I came across this pattern just love it! I am the editor of AllFreeCrochet.com and would love to feature your tutorial on my site with full credit to you. I know my readers would love it as well, and in return would generate some nice traffic to your site. If you agree and would like us to feature your project, our readers will simply click the link to your blog to get your full tutorial. It's really that simple. Please let me know if this would be ok. I look forward to hearing from you!
ReplyDeleteJenny
Jbenoit@primecp.com
Yes! That would be wonderful!
DeleteTurning out great so far, but I couldnt get the cross thing down the 3rd 4th 1st 2nd so i left it all straight just alternating between 4 fptr and bptr
ReplyDeleteThanks so much!!!
Amanda
Thank you for the feedback! I added some detail to the instructions in row 5. You are skipping the first 2 stitches, fptr in the next two stitches, and then going back to the first 2 that you skipped and fptr in those. So you fptr in the order 3rd, 4th, 1st, 2nd. Also, when you fptr in sts 1 and 2, those are done from the front, so over the top of the 3rd and 4th. That's what gives it the cross over look.
DeleteLet me know if that helps or if you have any more questions!
written patterns are like chinese to me.... any chance you will be posting a youtube tutorial in the future? i love this pattern but work best watching it done!
ReplyDeleteI know what you mean! I don't have plans on making one at this point in time but maybe in the future I will. I'm working on adding pictures to the more difficult parts of the pattern. Maybe those will help!
Deletethank you for sharing !
ReplyDeleteDo you know the yardage of yarn you used? And what is the weight of the yarn?
ReplyDeleteSimply Soft is a medium worsted weight yarn, 4 ply. And I don't know exactly the yardage but about 100 yards per adult headband.
DeleteHello,
ReplyDeleteIm having trouble with row 6, am i still bptr in 4 fptr? or only the 2 that are on top? :)
Hi! You want to bptr in all 4 fptr. Do the two on top first and then you kinda have to pull the other 2 forward so you can get your needle in the posts of them! Good luck! (you are straightening your stitches out so you can "cross" them on the next row)
DeleteSo excited to try this!
ReplyDeleteSandy
This is fantastic! Great directions and SO quick!!! I will be making a pile for presents this year! thank you!
ReplyDeleteThat's great!! I'm so happy to hear this! :)
DeleteJust made this! Love it! Thanks:-D
ReplyDeleteMade this one for my granddaughter tonight! It was quick and easy. Will be making more for sure. Thanks!
ReplyDeleteI just made this as a xmax present! Love the pattern, thanks for posting it! Now, I need to make one for myself:-)
ReplyDeletei like your pattern, at first when i looked at it, i know i can't do it, but when i start following it. wow, it nice. love your pattern. thanks.
ReplyDeleteMelissa, I made your headband for my boyfriend's mother. I posted my results. Thanks so much for sharing.
ReplyDeletehttp://diyescapades.blogspot.com/2012/12/cable-stitch-ear-warmer.html
Wow! This is great! Thanks so much for sharing my blog!! Your headband looks great :)
Deleteok so i'm still not getting the cable pattern. i've done it twice following the direction and it look likes a bunched up mess :( help?
ReplyDeleteHi!! The cable technique is hard to explain through a pattern...I have found a video on youtube from another crocheter that I think illustrates the technique well!! Check it out and let me know if you still need help :)
Deletehttps://www.youtube.com/watch?v=x0XaqTQaYyM
You rock! This is awesome! Will be trying it soon. Thanks for the pattern! I'm so excited.
ReplyDeleteLiz
liz-makes.blogspot.com
Awesome! I just checked out your blog and pinned a few crocheted items I loved and am going to make! THANK YOU! Hopefully those pins get circulated!!
DeleteThank you so much for this pattern!! Took me a while to figure it out but I did and I LOVE it. And my name is Jenna so it's just that much better :) thanks again!
ReplyDeleteAwesome! Glad you love it Jenna! :)
DeleteI just learned to crochet about a month ago and all I've made so far is a flower, leg-warmers, and part of a scarf.... Just started making this and I'm super excited about it! It amazes me that you can make up your own patterns, especially this creative. Awesome awesome! :)
ReplyDeletehttp://counting-to-31.blogspot.com/
Thank you! I started out crocheting from a book 2 years ago and I taught myself and am now writing my own patterns! You will be amazed at what you can do! Keep pushing yourself and try challenging patterns and have fun!!
DeleteLove your pattern so different and beautiful. Thanks for sharing it with all of us.
ReplyDeleteSusie
You're welcome Susie!
DeleteAm going to start making this for myself as soon as it is done printing...love your pattern! Keep up the good work and the best of luck to you :) I am sure your Grandmother would be proud of you!
ReplyDeleteBrenda
Thank you Brenda! I really appreciate the love. Have fun!
DeleteI plan on making this for my great niece. Thank you for offering the pattern free. I have rarely bought patterns and truly appreciate those of you who share for free. I really had hoped Pinterest would stay a free "share" site, but there are those who want to make a living from it, sadly. I will give you all the credit you deserve for designing this ear warmer/headband. I have not gotten to the point of "designing" although I have crocheted for over 40 years.
ReplyDeleteIts great. I'll try to do it soon. :)
ReplyDelete---------------------------------------------
facebook.com/amy.crochet.33
amy-crochet.blogspot.com
I am loving this! My niece found it on Pinterest and asked if I could make one for her. I'm pleasantly surprised how easy this pattern is; I was expecting more difficulty -- but this is great! Thank you!!
ReplyDeleteI am making this in pink camo for my niece who is 14. I've never done a cable stitch and I love how it's stitching up. It really gives a nice sense of depth to the typical headband. I do think, however, after making it with a variegated yarn, that it looks much better in the single color. I'll post a pic on my blog when I get it finished.
ReplyDeleteTracy
http://tracysstitchingblog.blogspot.com/
I am brand new to crocheting and I swear the patterns are like Japanese to me but I am soooo excited to try this!!
ReplyDeleteCan't wait to try this. Thank you!! :)
ReplyDeleteThis is a great pattern, thanks! You can see my results here: http://infinitelymorethanithink.blogspot.com/2014/01/crocheted-cable-headband.html
ReplyDeleteI was looking for something small to learn how to make crocheted cables. Your pattern was very well written. Thank you so much for the free pattern!!
ReplyDeleteI LOVE you patterns! They are extremely well done and so easy to follow! Thank you for sharing!! Post more more more!
ReplyDeleteJust made this and it is adorable!!! I've already had folks asking me make one for them. Thanks for sharing!!!!
ReplyDeleteIs it ok to sell these as fundraiser for American Cancer Society Relay for life? I plan to make in purple or pink
ReplyDeleteThanks for posting! I think adding some pictures of some of the steps would be extremely helpful. Just like some of the steps as you make it. Your phrasing is really simple though and easy to understand.
ReplyDeleteThank you for sharing your pattern!!! I have already made 3 headbands for gifts!!! Can't wait to make a couple more...maybe one just for me!!! The pattern is easy and classy looking!!
ReplyDeleteI always have extra stitches at the end of each row, between 1-3, after I do the 4 hdc. what am I doing wrong?
ReplyDeleteThis is a great pattern!! I've tried cable patterns before and they never came out right but you explained how to achieve the cable so I could understand.....thank you!!
ReplyDeleteLove the pattern!! first time EVER able to do a cable stitch!! Thanks so much!!
ReplyDeleteLove the pattern! Is it okay to sell a finished product? Obviously would include a link to this page....thanks!!
ReplyDeleteThank you! That's fine- you may sell the finished product. Enjoy!
DeleteFound your pattern..had some extra yarn on hand and bam! 1h later I have an amazing cabled headband to wear :) Thank you so much for this great and easy pattern :))
ReplyDeleteHi, I am the Education teacher for the NYC Crochet Guild. I would like to ask you for your permission to use your pattern of the Cable headband to teach it to our members. I have made this headband and it is my favorite one to make.
ReplyDeletePlease let me know what you think.
Sincerely,
Myrian Primera
Hi Myrian! Yes you may. All I ask is that you return the credit to me. Enjoy and have fun!
DeleteThank you for the pattern. I sewed a piece of fleece on the inside for extra cozy warmth.
ReplyDeleteSo pretty, easy, and quick. Thank you!
ReplyDeleteeasy instruction thank u fu
ReplyDeleteor the lovely pattern
Need a scarf pattern to match!I'm hooked on this pattern! Thx
ReplyDelete